Crinkle Cake
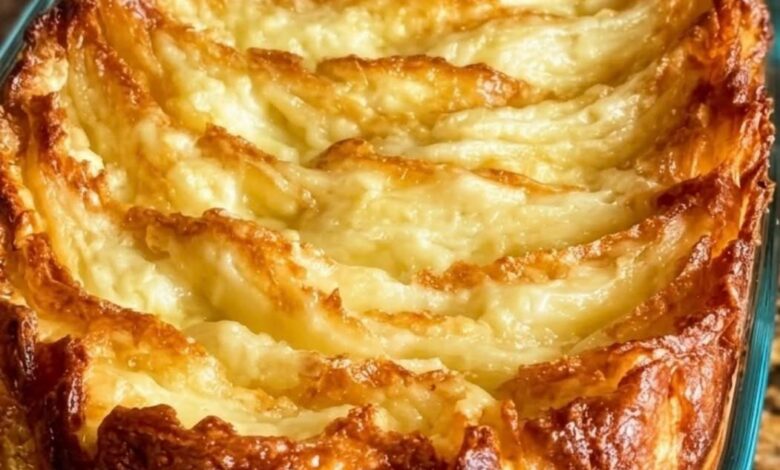
There is a very specific kind of magic that happens when you pull a Bundt cake out of the oven. You invert it onto a cooling rack, lift the pan away, and there it is: a towering, golden cake with a top that is beautifully cracked, crinkled, and textured like a rustic landscape.
If you are anything like me, you love the idea of serving a stunning, bakery-style dessert, but you certainly don’t want to spend all day measuring, sifting, and fussing over complicated techniques. Living on my own at 73, I’ve learned that the best recipes are the ones that deliver maximum visual impact and comforting flavor with absolute minimal effort.
Enter the Classic Sour Cream Crinkle Cake.
This cake is the ultimate “fake it till you make it” dessert. It relies on a clever shortcut and a little bit of kitchen science to create that signature crinkled top. It’s so simple that it follows my mother-in-law’s golden rule for family gatherings: it uses just a handful of core ingredients, yet it is so highly enjoyed and visually striking that people assume you spent hours on it! Plus, it’s the perfect candidate for my favorite hobby: wrapping it up in a beautiful box with a ribbon to gift to friends. Grab your favorite mixing bowl, because we’re about to bake a little piece of art.
Why This Recipe is a Total Game-Changer
As someone who truly appreciates the science behind good cooking, I have to share why this specific combination creates such a beautiful result.
The secret to the “crinkle” is all about the heat and the moisture. When you drop this thick, rich batter into a properly preheated, hot oven, the outside of the cake sets and forms a crust very quickly. However, the inside of the cake—loaded with moisture from the sour cream and eggs—continues to heat up, expand, and rise. That rising interior pushes up against the already-set exterior crust, causing it to crack and fissure beautifully. It’s a perfect marriage of a hot oven creating lift and a rich batter creating texture!
Ingredients You’ll Need
The beauty of this recipe is its absolute simplicity. You likely have everything you need right in your pantry and fridge.
The Cake Base:
- 1 box (15.25 oz) yellow or white cake mix: The ultimate no-fuss shortcut! Substitute: A lemon cake mix is also incredible if you want a bright, citrusy crinkle cake.
- 1 cup full-fat sour cream: This is the secret ingredient! It adds incredible moisture, a slight tang, and the density needed to create those beautiful crinkles. Substitute: Full-fat plain Greek yogurt works in a pinch.
- 4 large eggs: Room temperature is best so they blend smoothly and provide the best lift.
- ½ cup vegetable oil (or melted butter): Oil keeps the cake incredibly moist for days. Substitute: Melted butter will give it a richer, more traditional flavor.
- 1 teaspoon pure vanilla extract: For that warm, bakery-style aroma.
The Simple Glaze:
- 1 ½ cups powdered sugar: Sifted if it’s lumpy.
- 3 to 4 tablespoons milk: Add slowly until you reach a drizzling consistency.
- 1 teaspoon pure vanilla extract.
Step-by-Step Instructions
Let’s get baking! I promise this process is incredibly relaxing and straightforward.
1. Heat the Oven (The Most Important Step!)
Preheat your oven to 350°F (175°C). We want that nice, steady heat to create the perfect rise and that gorgeous cracked crust. Generously grease and flour a 10 or 12-cup Bundt pan. Pro tip: Use a baking spray that already has flour in it to guarantee the cake releases perfectly!
2. Mix the Magic Batter
In a large mixing bowl, combine the cake mix, sour cream, eggs, oil, and vanilla extract. Using a hand mixer or a stand mixer, beat on medium speed for about 2 minutes. The batter will be much thicker and heavier than a standard cake batter—that is exactly what we want! That thickness is what creates the crinkles.
3. Bake to Golden Perfection
Pour the thick batter into your prepared Bundt pan and smooth the top. Bake for 40 to 45 minutes. You’ll know it’s done when the top is deeply golden brown, the cracks look dry, and a toothpick inserted into the center comes out clean.
4. The Crucial Cool
Let the cake cool in the pan on a wire rack for exactly 15 minutes. Science tip: If you flip it out immediately, it might break. If you leave it too long, the sugars will cool and stick to the pan. After 15 minutes, gently invert it onto the rack and let it cool completely.
5. Glaze and Decorate
Once the cake is completely cool, whisk together your powdered sugar, vanilla, and enough milk to create a smooth, drizzle-able glaze. Pour it over the top of the cake, letting it drip down those beautiful crinkled sides.
Pro Tips, Variations & Gifting Ideas
Quick Tips for Success
- Don’t Overbake: Because this batter is so dense, it can dry out if left in the oven too long. Start checking it at the 40-minute mark.
- Room Temperature Ingredients: Taking your eggs and sour cream out of the fridge 30 minutes before baking helps them emulsify better, creating a smoother, more uniform crumb.
Fun Variations to Try
- Chocolate Crinkle: Use a chocolate cake mix and add ½ cup of chocolate chips to the batter.
- Berry Antioxidant Boost: Since I am very proactive about cancer prevention and maintaining my health through dietary choices, I love serving this cake with a massive mound of fresh, antioxidant-rich berries (like raspberries and blackberries) on the side or tucked into the center hole.
- Citrus Zest: Add the freshly grated zest of one lemon or orange to the batter for a bright, uplifting flavor.
How to Serve and Gift It (The Interactive Dessert Bar!)
Since I love desserts that can be easily customized, this cake is perfect for a self-serve format. Slice it thick and serve it on a beautiful platter alongside a self-serve coffee and tea station. It pairs absolutely beautifully with a warm cup of Earl Grey tea, a classic dark roast coffee, or even a glass of sweet Moscato!
The Giftable Twist: Because I love preparing homemade treats that are visually appealing and special enough to be appreciated by friends, this cake is my go-to gift. Once the glaze has set, I place the cake on a nice cardboard round, wrap it loosely in parchment paper, tie it with a beautiful ribbon, and tuck a sprig of fresh rosemary or a lemon slice under the string. It looks like it came from a high-end boutique bakery!
Frequently Asked Questions
Q: Why didn’t my cake crinkle on top? A: The crinkles happen when the outside sets faster than the inside rises. If your oven wasn’t fully preheated, or if you used a “moist” cake mix recipe that called for too much liquid, the top might stay smooth. Stick to the exact measurements (especially the sour cream!) and ensure your oven is at the right temperature.
Q: How do I store leftovers? A: Because of the sour cream, I recommend storing this cake in an airtight container or cake carrier at room temperature for up to 3 days, or in the refrigerator for up to 5 days. The sour cream actually keeps it incredibly moist, even on day three!
Q: Can I freeze this cake? A: Absolutely! This cake freezes wonderfully. Wrap the completely cooled, unglazed cake tightly in plastic wrap and then foil. Freeze for up to 3 months. Thaw it overnight in the fridge, bring it to room temperature, and then add your fresh glaze before serving.
Let’s Bake Some Beautiful Memories!
I truly hope this Classic Sour Cream Crinkle Cake brings a little extra joy, beauty, and comfort to your kitchen. There is something so deeply satisfying about taking a few simple, humble ingredients and turning them into a show-stopping dessert that looks like a work of art. It’s proof that you don’t need to spend hours in the kitchen to create something truly special, whether you are serving it to a crowd or gifting it to a dear friend.
If you try this recipe, I would absolutely love to hear how it turned out for you! Did you stick to the classic vanilla, or did you try the lemon or chocolate variations? Drop a comment below to let me know, and please share this recipe with a friend who needs a foolproof, beautiful dessert idea this week. Happy baking, and I’ll see you in the kitchen!